How to Read Last Value of Feed in Adafruitio

Feeds are the core of the Adafruit IO system. The feed holdsmetadata about the data you push to Adafruit IO. This includes settings for whether the data is public or private, what license the stored sensor data falls under, and a general description of the data. The feed also contains the sensordata values that get pushed to Adafruit IO from your device.
You will need to create one feed for each unique source of data you send to the system. For example, if you have a project with one temperature sensor and two humidity sensors, you would need to create three feeds. One feed for the temperature sensor, and one feed for each humidity sensor.
First, let's take a look at how to create a new feed using Adafruit IO.
Creating a Feed on Adafruit IO is a very simple process. When you login to your io.adafruit.com account, you will see a list of your current dashboards like the list shown below.

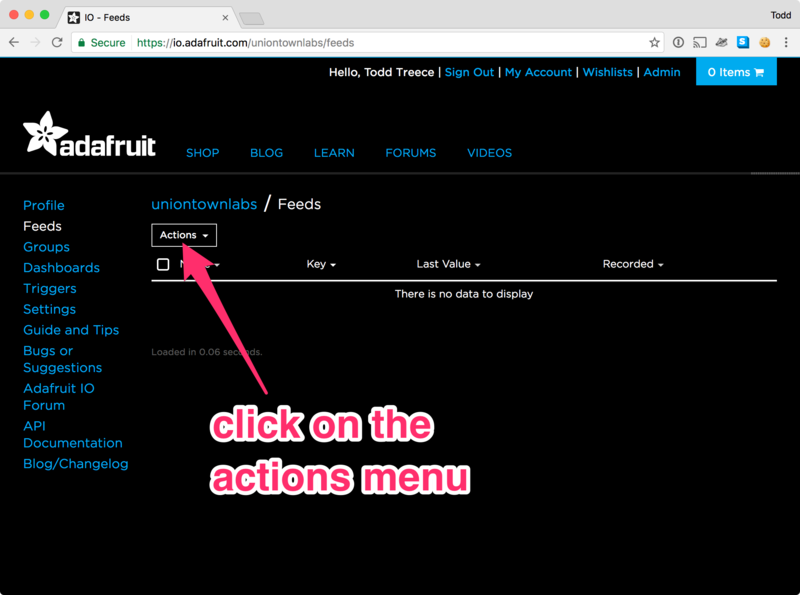
Click the Feeds link on the left hand side of the screen to navigate to the Feeds list.

Next, click on the Actions menu on the left hand side of the screen.
Next, click on the Create a New Feed menu item.

A form modal will launch, and you will be presented with two text inputs:
- Name - A short descriptive title of your data. Letters, numbers, and spaces are valid characters, and this field is required. The feed name must be unique for your account.
- Description - A long form description of your data. This field is not required, but it's useful to provide a detailed description if your feed will be public.

Click the Create Feed button once you have finished entering your feed's name and description. You will then be redirected to your new feed.

Next, we will look at how to edit a feed.
If you need to change the name, key, or description of your feed, you can do that by navigating to your feed and clicking the gear icon under the Feed Information menu on the right hand side of the screen.

You will be presented with a form so you can edit the name, key, and description of the feed. The key for a feed can be used when accessing the feed programatically. By default, the key is a lowercase version of your feed name with any spaces replaced with dashes. You can modify the key to be any unique combination of lowercase letters, numbers, and dashes.

Click Save once you have finished editing the values.
License Settings
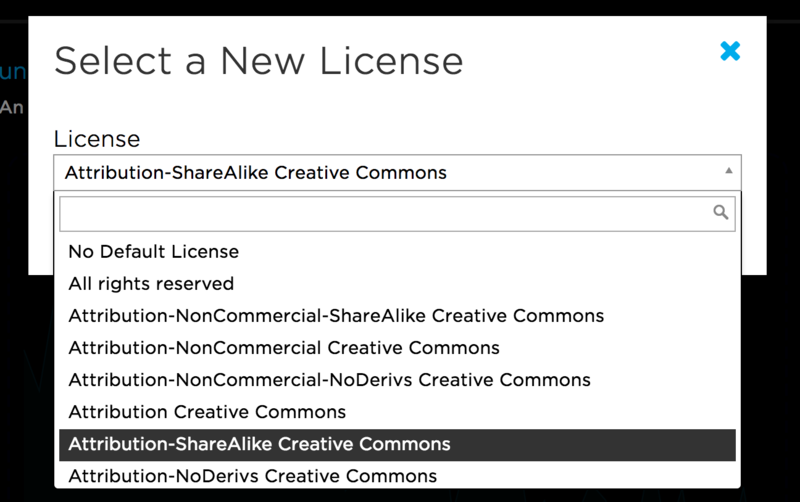
If you are sharing data publicly, you should set the appropriate license for your data. You can choose to reserve all rights for the data, or license it under any of the Creative Commons licenses in the list.

To change the license for your feed, click on the gear icon under the License menu on the bottom right of the screen. You will be presented with a list of licenses to select from. Click on the license to save your selection.

You will then be presented with a menu of licenses to select from.
Click on the Save button to save your license selection.

Privacy Settings
If you would like to share your data publicly, you can change your feed's privacy settings to make the feed public. To do this, you will need to click on the gear icon under the Privacy menu on the right hand side of the screen.

Select either Public or Private from the menu, and click the Save button to change feed visibility.

Notification Settings
When notifications are activated, Adafruit IO will send an email to alert you if no new data has been received for your feed within the given amount of time. To change the notification settings for your feed, click on the gear icon under the Notifications menu on the right hand side of the screen.
Feed Notifications are an Adafruit IO+ (Plus) Only Feature

Next, enable notifications by selecting ON from the status menu, and selecting a timeout. Click Save when finished.

History Settings
Turning history off for your feed will mean only the last value received is stored. History is on for all new feeds by default, but you can turn history off if you would like to push large values. By default you can push values up to 1KB in length, but with feed history off, you can publish values up to 100KB in length.
To change the history settings for your feed, click on the gear icon under the Feed History menu on the right hand side of the screen.

Next, enable or disable history by selecting ON or OFF from the menu, and click Save.

Finished with a project and want to delete the feed? Let's learn how to do that
If you would like to delete a feed, you will first need to navigate back to the list of feeds by clicking on the Feeds menu item on the left hand side of the screen.

Once the list of feeds has loaded, you will need to click on the checkbox next to the feed you wish to delete.

Next, click on the Actions menu and select Delete Selected Feeds from the list of options to delete your feed.

Next, we will look at how you can download the data from your feed in various formats.

Making your feed private will make it only visible to you, while making it public will make it visible to the world. But what if we want to share a feed with one person, or a specific group of people?
You'll want to use Adafruit IO's feed sharing feature. Feed sharing allows you to invite someone to view a specified feed. This is a great feature for if you're building a project with multiple sensor nodes, but don't want to make your feed public to strangers, only your friends.
Feed Invitations
Decided on which feed you'd like to share with somebody else? You'll first need to send them an invitation.
Navigate to the feed page for the feed which you'd like to share. Then, click theSharingtext on the sidebar

You'll be greeted with the Sharing Settings window. You can invite somebody you know using either their Adafruit IO Username or their personal email address.
You'll also be given two options for their access to your feed. If you give themRead access, they'll only be able to view the feed you share.

Want to give them the ability to readand publish data to your feed?
Selecting the Read + Writeaccess level will give the user you invite the ability to both read from your feed and write to your feed.

Once you have the email/username field filled, and the access level configured, go ahead and clickSend Invitation.
If the person you're sharing with does not have an Adafruit IO account associated with that email, don't worry! They'll be prompted to create one through the email.
Accepting a Shared Feed Request
Now it's the other person's turn. After you clickSend Invitation, they should receive an email from Adafruit IO informing them that you've shared a feed with them.

ClickingReview This Feed Share will show them the details of the share, their access level, and allow them to either accept, deny, or block the request.
The Sharing Page
To see the available shared feeds, click theHome button, then theSharingbutton on your Adafruit IO dashboard. This is the sharing page - a central point for your Adafruit IO account's sharing information.

You'll be presented with links to the feeds which you are currently sharing, the feeds which are shared by you, and a list of blocked users.
Who Shares What?
All data rate usage comes from the publishing user.
Data rate usage for feeds is dictated by whomever is publishing to the feed. If you are sharing a feed, your data rate will remain unchanged until you publish (write) to it. If you have access to a shared feed with write access, publishing to the feed will effect your data rate usage, but not the rate usage of the person sharing the feed.
Social Web Service Security: Blocking, Ignoring and Unsubscribing
Because Adafruit IO is an open web service, we don't review every single feed sharing invitation before it's sent. In order to prevent repetitive unwelcome sharing invitations from anyone, we will always give you the ability to:ignore individual invites,block a user from being able to invite you to share, orunsubscribe from all sharing invitation emails.
When youignore an invite, it will be cleared from your sharing page and the user who invited you won't be able to invite you to that feed again, but they will be able to invite you to share any other feed they own.
When youblock a user, they will no longer be able to share any feeds with you at all. Users will never be explicitly informed that you have blocked them, but they may be able to infer it if they can't share anything with you. Sharing blocks are permanent until and unless you remove them.
Choosing tounsubscribe from sharing invitation emails will keep your inbox clean, so you'll have to visit your sharing page to see if you have any new sharing invitations.
Adjusting Access Levels
Need to adjust the access level a user has to a shared feed? You can this from the feed page'sSharing Settings window. The window shows the feed owner and the person you shared the feed with. ClickEdit to allow you to adjust their feed access privileges.

Now, let's modify their access level. Clicking on the dropdown will give the choice of Read or Read + Write .When you clicksave changes, Adafruit IO will apply a different access level to the account.

Want to make sure they can't access the feed anymore? You can revoke their access by clicking theDelete button.

Want to quickly change feed access levels of multiple feeds? On the sharing page, you can see a list of the feeds you are sharing. ClickingEdit will bring up a dropdown menu allowing you to select the shared access level.

Code Examples
Arduino
We've integrated feed sharing into the Adafruit IO Arduino library. Setting up a shared feed is similar to the process of setting up a regular feed, with just one change!
After you set the name of the feed (in this example, we're using feed-name). Then, set the owner of the feed (feedOwner):
AdafruitIO_Feed *sharedFeed = io.feed("FEED-NAME", "feedOwner");
Note:Make sure you know of the access-level you have to this feed. If you have Read-only access, you arenot able to write to the feed.
Python
We've also updated the Adafruit IO Python client to include feed sharing.
Instead of subscribing to your own feed:
client.subscribe("io-feed")
We'll add the username as a second argument to the method, to subscribe to the feed belonging to the owner:
client.subscribe("io-feed", "io-feed-owner" )
Feed sharing using the Adafruit IO Python client isnot supported by the REST-based API client -only the MQTT client (mqtt_client) is supported.
If you would like to download all of the stored data from your feed, you can do so by navigating to your feed from the Feeds list. Click on the name of your feed to load it.

Next, click on the Actions menu below the feed chart.

Select Download All Data from the actions menu.
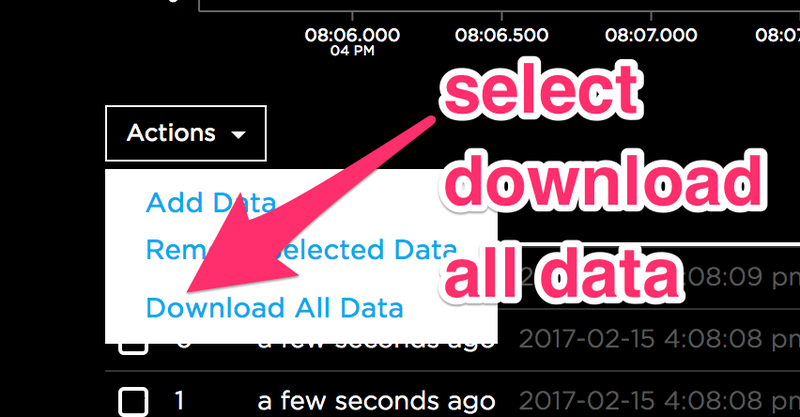
You'll be given two file formats to download your feed data: either as a JSON or CSV file. Both of these files will contain all the data points from your feed - perfect for using an external program to manipulate, analyze, and graph your feed's data.

Next, we will look at the options for interacting with feeds using the REST API and client libraries
If you would like to learn more information about accessing feeds via the Adafruit IO REST API, you can check out the official API documentation.
We also have a growing list of client libraries. Each library supports reading, creating, updating, and deleting feeds. Visit the links below to learn more about the library you wish to use.
This guide was first published on Apr 20, 2015. It was last updated on Apr 20, 2015.
Source: https://learn.adafruit.com/adafruit-io-basics-feeds/resources?view=all
0 Response to "How to Read Last Value of Feed in Adafruitio"
Post a Comment